Showing posts with label art programs. Show all posts

Tuesday, June 18, 2019

Little Crafts, Big Kids: A Super Short Blog Post


Overall, I blog about, I'd say, close to 75% of my programs. I'll skip a post for things like, open play and variations of open play; I only rarely blog about my weekly Musical Kids program; and occasionally I'll skip a post because I'm just too lazy! Anyway, it's been several months since my program called "Little Crafts, Big Kids" for children in grades 1-3 and I wasn't going to blog about it, but I've been thinking about it lately. It was super simple, but it was kind of a cool idea, and maybe it's worth noting here quickly.

Little Crafts, Big Kids was literally just that. I set up a bunch of "baby" crafts (one thing at each table) and let the school age kids enjoy. I only had 3 kids show, but everyone had fun!

There was play dough...


...Color-Your-Own Tote bags...


...Finger paint...


...And foam picture frames (these from Oriental Trading) with assorted foam stickers (these from Oriental Trading and these letters, also from Oriental Trading), but nobody did this craft-- except me!

What worked least: I guess this one's simple. Nobody did the picture frame craft so I guess it was the least appealing thing I had out.

What worked best: The play dough by a LANDSLIDE. If I ever do any variation of this again, I'd probably get some more complex play dough toys and just do a play dough for big kids program, skip all the other stuff entirely.

Tuesday, May 14, 2019

Muffins with Mom


What do moms like? Coffee, snacks (in this case muffins--mainly for the alliteration), a low-stress craft, and light piano music! This is what I tried to deliver at my day-before-Mother's-Day program called "Muffins with Mom."

It wasn't complicated. Moms and their kids ages 3 through 3rd grade came in, sat together, enjoyed coffee and muffins, decorated flower pots, and did a simple hand print craft.

I arranged the room so that the table all the way to one side had the muffins and coffee and the table all the way to the other side of the room had the craft supplies: paint, some small decorations (gems and pom poms), and tacky glue. The tables in the middle were arranged so that each setting had a flower pot and flower pot tray to paint and decorate, an empty paint pallet, and paint brush. Then I also put a small pile of the hand print craft on each table.

I told everyone that only the grown ups would get the paint and craft supplies from the back table and it worked out perfectly. That way the kids weren't even tempted to mess with any of that stuff. Here is a picture of some people getting paint for their pallets:


Unfortunately, I didn't take a picture of my snack table set up but it was pretty! I even artfully arranged the muffins on a platter. But here are some pictures of kids and parents working on their flower pots and eating muffins:


The handprint craft I had came from gluedtomycraftsblog.com and was a great, simple, extra small craft. In fact, I have my sample (made by Sadie) hanging above my desk as we speak. People really liked it!


What worked least: This was a total success but I guess, if I'm being super nit-picky, I forgot to put out the water cups for kids to dip their paint brushes in? I mean, this was a two-minute problem that was easily rectified the second I realized it, but I don't know, I'm just looking for a "least," I guess.

What worked best: The crafts! They were the perfect choice!

Overall, this was a really nice program that I left feeling really happy with. Everyone had fun and I genuinely think that I created the sort of "chill mood" I was aiming for (thanks partially to the piano music playlist I found on Spotify!). The patrons definitely played a factor in the success of this program too. I had SUCH a great group of families in attendance! This is a definite must-repeat for next Mother's Day.

Wednesday, May 1, 2019

100th Anniversary of Children's Book Week


Children's Book Week is the nation's longest-running literacy initiative and this year--this week in fact--marks its 100th anniversary! To celebrate, I planned a self-directed program revolving around picture books. There were 4 tables, 1 craft per table, each based on a different picture book. So the idea was that the families would move around from table to table, read the book together, and then make the corresponding craft.

You might remember (but probably don't!) that about 4 years ago, I planned a program called Discover Picture Book Art. Inspired by seeing Lois Elhert speak at a conference, that program was basically this same thing: 4 different artists' books displayed and a chance to create art in those similar styles. The only difference is that I missed that program because I was out on disability after a bad car accident. The only other difference is that my colleague set that program up (again, because I wound up having to miss it) and she did it so so so beautifully and, while I really tried, I just don't think I did as nice of a job as she did. She's just got a natural eye.

Anyway, these are the 4 books I used: 

The Hidden Alphabet by Laura Vaccaro Seeger
Color Zoo/Color Farm by Lois Elhert
I Spy by Jean Marzollo


The program was for ages 2 and up so I wanted to try to accommodate lots of different ages. Some of the crafts were simple and some were more challenging. Let me get into each one in more detail...

1. Go Away Big Green Monster by Ed Emberly


Perfect for the younger ones, this easy, almost "throw away craft" was, of course, the most popular one we had out. It's always like that, isn't it? The simplest thing is the fan favorite? It was just printed directly from kizclub.com. I put out several of their Go Away Big Green Monster black and white printable sheets with crayons, scissors, glue sticks, and paper plates. And that's it! And everyone liked it!

2. The Hidden Alphabet by Laura Vaccaro Seeger


I don't want to say this craft was for the grown ups, but well, this craft was kind of for the grown ups. It was inspired by Laura Vaccaro Seeger herself! I saw her speak at a children's librarian dinner a few a weeks ago and she had this cool craft for all of us to try based on her book, The Hidden Alphabet. Everyone got a piece of paper folded down the middle like a greeting card. On the front, the card had a square cut out of the middle. Laura Vaccaro Seeger told us to draw a picture of something in the middle of that square, then open the card and turn that picture into the letter that that thing begins with.

So... here are some actual examples made by the actual Laura Vaccaro Seeger:


The bottom two panels show balloons that then open to reveal a big B. The top picture shows eggs making an E (the picture with just eggs in the black window isn't pictured).

And here's my awful example:


While I am here, continuing to try to think of more creative ways to turn pictures into letters, I think this was way too hard for the kids. Although some parents got kind of into it.

3. Color Zoo/Color Farm by Lois Elhert


Shapes, shapes, shapes! Super simple, this was just straight up collaging with shapes. I put out pre-cut shapes, paper, glue, and crayons and the kids went to town. The best part about this craft is that it could be for any age! It's easy, cheap, versatile, and open-ended!

4. I Spy by Jean Marzollo


This craft was the one that the older kids seemed to migrate toward. It was making your own I Spy style scene. I collected a bunch of stuff from around the library and also gave the kids paper to create a background scene. Then they could arrange whatever random things on the paper, take a photo of it, and write a little "I spy..." list to go with it. Here is my example:

I spy 12 red hearts, a taco, a bunny ears ring, and a green feather.

What worked least: I hate to say it, but I think the Laura Vaccaro Seeger craft was too challenging. Not only that, but compared to the others, it was also the least appealing on the table. I was really excited about it, but unfortunately, I'm not sure if this was the right venue to debut it. Maybe another time.

What worked best: The super simple Go Away Big Green Monster table was a hit. This one required the least amount of effort for me to set up and was also the one that I think the families enjoyed most! It's always the way!

Thursday, April 26, 2018

Recycled Crafts for Earth Day


I'm not sure why, but I have always been pretty enthusiastic about Earth Day. I've done library programs for it in the past, but took a break for a while when my effort to use only recycled materials became daunting instead of fun. This year I decided to get back into it, only I told myself each craft only needed to include one recycled material, instead of being completely recycled. Plus, as I think I have mentioned many times before, I really prefer to do programs with several simple crafts, rather than one longer one. So that's what I did! Recycled Crafts for Earth Day.

I had a small yet appreciative group of 3-5-year-olds (and their parents) and four crafts for them to make, each including at least one recycled material, in an open, unstructured type of program. There was one craft per table and the families moved around from table to table to try their hands at whatever they wanted for the duration of the time. And, as usual, I accompanied the evening with a playlist! Here's what we did:

Toilet Paper Tube Black Bears


I got the idea for these little guys from CreativeFamilyFun.net (but found it on Pinterest). I was looking for a simple toilet paper roll craft that didn't require cardboard cutting, too many pieces, or too much letting paint/glue dry. In the end I settled on this, even though it required painting, because all the tubes could be painted the same color so I was able to do it ahead of time. Plus LOOK HOW CUTE. I put out the pre-painted black tubes, small squares of brown construction paper, scissors, black markers, glue sticks, tape, and self-adhesive googly eyes (the biggest of these from Oriental Trading). The kids and parents liked this project, however I decided this one was more parent-heavy and required less from the kids than I prefer. Maybe it would have been better for a slightly older crowd. Even still, it was fun for the families and the final product was really cute.


Baby Food Pouch Cap Spiders


From Pinterest again, these were technically a Halloween craft from Plum organics, but were surprisingly the stand out hit of this program! The kids LOVED these little guys. Everyone wound up making several spiders, parents included! And they were so easy! The only things I'd put out were caps from baby food pouches, pre-cut-in-half piper cleaners, and self-adhesive googly eyes (the smallest of these from Oriental Trading). Then, I showed the whole group how to weave the pipe cleaners from one side of the cap to the other (as seen here) and then sort of bend them so they'd stay in place and seem "spidery." The googly-eyes, while self-adhesive, were a little delicate for small hands so I helped the kids out a little there too, but overall everyone really really liked these!


Bubble Wrap and Paper Plate Jellyfish


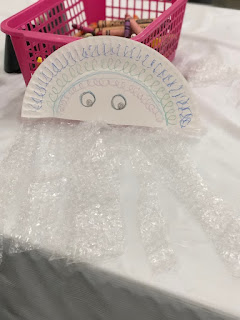
After an entirely Internet-purchased holiday season, I did a lot of Pinteresting to find a good bubble wrap craft that I felt comfortable with. I had considered just bubble wrap painting and maybe I should have gone that route, but instead I decided on this cute little jellyfish that I found on GluedToMyCraftsBlog.com (from Pinterest) that I really liked! I thought it was perfect: didn't require too much in the way of supplies and allowed for creativity. BUT NOBODY MADE IT! So disappointing! One family took the supplies home and, for everyone else, it was ignored. To be fair, I didn't have a huge turnout to begin with and the program was only 30-minutes but still. Not one kid even attempted the craft at this table. Next time I'll do the painting instead!

CD Sun Catchers


This one was so easy, there's almost nothing to say about it! I put out old CDs, ribbon, and these self-adhesive gems from Oriental Trading and then let the kids go to town decorating! I got the idea from HappyHooligans.ca (found on Pinterest), but kept the whole thing super easy by using the self-adhesive gems and eliminating the glue part entirely. Everyone did a nice job!


What worked least: I guess my bubble wrap jellyfish were not appealing since nobody migrated toward that table at all. Maybe it was too much white and nothing colorful to draw people over? Whatever it was, something was amiss. But crazily, I'd try it again! Maybe if I had a bigger crowd and/or more time, the kids would have enjoyed it! Next Earth Day!

What worked best: Those little spiders! Everyone loved 'em!

Friday, January 19, 2018

Pre-School Art


Back in October I did a program called Easy Art, which was the inspiration for this similar version of the program. This program was all about process, not product. Like Easy Art, it was meant to be a chance for kids (ages 2-5) to get messy, be creative, and have fun! (In the newsletter, I wrote "dress for a mess.")

I had four "creative stations" set up. Then, when the kids came in, I put on some music and let them move freely around the room, from station to station, making crafts and exploring. Same format as Easy Art and tons of fun for everyone!

Here are the stations I had set up:
Watercolors


To accommodate different ages and abilities, along with the watercolor palettes, I put out sponge brushes, skinny paint brushes, and white crayons for a little wax resist fun. The white crayons went largely unused but a few parents wrote little messages for their kids to uncover and it was cute. This was probably the most "challenging" station of the bunch, but the kids really had fun and did great!


Stamping


This station was the easiest for me to set up. Kids ages 2-5 don't need anything too fancy here. I put out some big white paper, 4 stamp pads, and an assortment of rubber stamps and let the kids go wild. It was enough! Everyone had fun!


Collage


I think the collage table was consistently one of the most crowded stations of the afternoon. I put out colored construction paper (yellow and baby blue), scissors, pre-cut shapes, glue sticks, Elmers glue, a TON of assorted pom poms, and colorful pre-sticky-backed buttons. The kids really got creative here (see below). I wound up seeing a really big variety of completed projects. Some kids did lots of cutting; some kids built pom-poms up to make really neat 3D art; and some kids wound up making a lot of things that looked like happy faces. The kids spent a lot of time here. This station, again, was a total success!


Play Dough


What can I say? It's play dough. Easy to set up, fun to work with, and the only station that required a tarp on the floor below it. This was the only station where the kids didn't get to take their product home, but nobody seemed to mind-- play dough is worth it! Plus this wasn't a program meant for taking home an awesome craft, but a program meant for playing and being creative!


What worked least: A few years ago I let myself put "nothing" for what worked least and today, I am doing it again. This was an easy program that, despite taking a decent amount of set-up, didn't take a lot of planning, money, supplies we didn't already have on hand, or exhaustion on my part. The kids liked it and the parents liked and--what can I say besides it just worked?!

What worked best: I'd say, while again, all of this program felt like a success to me, the two "best" stations of the hour were the play dough and the collage.

Overall, this was really fun! I definitely need to do more programs like this one and Easy Art in the future.