Showing posts with label ages 2-5. Show all posts

Tuesday, February 11, 2020

Snow Much Fun


Full disclosure: This was a straight up repeat program! The only thing I changed was the book that I read. You can read my original post here, and read on below for the *new* and (juuuust barely) updated version:

As usual, we started with a book. This time I read the classic, Snowy Day by Ezra Jack Keats. It's perfect for this age group, and, in fact, perfect for lots of age groups. Just about a week before this program we had an actual snowy day, which I think was a good reference point for making the story sort of come to life for the kids. I was was able to ask things like, "Did anyone else make angels in the snow the other day?" and the kids could actually remember if they did or didn't.

Next, was the craft. I did the same thing I did last time: snowflake tape resist paintings. For this, mom/dad/caregiver puts down painters tape in the shape of simple snowflakes and then the kids can watercolor over the whole sheet however they want. This time I added dot markers to the mix too. Then, later, when the tape is pulled up, it looks like a snowy sky! Just a thing to note: Don't have patrons pull the tape off until their paint has dried. It's way easier and there's a much lower chance of the paper ripping this way. Here are a few craft pictures:


Last, when there were about 20-minutes left in the program, I took out the "snow" bins. These were cooling for about 30-45 minutes in the fridge ahead of time, just for fun. This was the part of the program that we were all the most excited about. It was a chance for the kids to get some good sensory play in. The snow wasn't made with the kids, but rather made ahead of time for the kids. There are a lot of homemade snow recipes floating around online, but my go-to one is ridiculously easy! It is made with only baking soda and white conditioner:

Two 1-lb boxes of baking soda + 1 cup of conditioner.  

2 boxes. 1 cup. Mix. Done. 

You wind up with something the consistency of dense snow, possibly just a little less wet and "pack-y." I also added a few plastic toy animals and matchbox cars to each bin, and, like I said, let them chill in the fridge for a little bit and--viola!--snow that's fun to play with inside! 


What worked least: I'll say the book worked least, but not because it was a bad book or even because it just wasn't a success. It was, in fact, probably about as successful as reading to 2-4 year-olds can be! But compared to the craft and the homemade snow, I'd call the book the least exciting part of the program.

What worked best: The snow! IT was SNOW MUCH FUN! We even played with it at home the next day, as seen below:

Wednesday, September 11, 2019

Tape Town!


Tape Town was AWESOMEEEEE. It's a lot to write about--SO many details--but here's my attempt to cover at least most of it.

I got the idea for Tape Town from a children's librarian's Facebook group that I'm in. Someone in that group did a program, also called Tape Town, that was really a totally different thing (it was more like a mini town made of toy things like matchbox cars and blocks, connected by tape roads). Here is the lesson plan that that librarian shared. Again, it's totally a different thing but it's what inspired OUR version of Tape Town.

Anyway, it was clear from the other librarian's lesson plan that this was going to be a two-librarian program, so I immediately recruited some assistance. Jen and I gathered ideas for our version of Tape Town for a month or so leading up to the program. The plan was that we'd have five different "places" to visit in a "town" connected by and made of masking tape roads, then have the kids get from place to place by scooter (which, conveniently, we already had!).

First, I'll share some pictures of the room. It took Jen and me FIVE solid hours to set this whole thing up. Making the tape roads around the room was super labor-intensive (and actually sort of complicated until I got in the swing of it). If you are planning to do this (and especially if, like us, the room you're using is carpeted) DO NOT WEAR A DRESS TO SET IT UP. I repeat, DO NOT WEAR A DRESS TO SET IT UP. I wore a dress and I regretted it immediately. I had rug-burned knees after literally minutes of crawling around and wound up scooting instead to alleviate this pain. But scooting on a scooter totally goes against everything I know about "dress etiquette" and I was just so uncomfortable the whole night from holding my body in ways I wouldn't normally hold my body. It was so dumb. It could have been easily avoided if I'd just worn pants instead. So learn from me. WEAR PANTS. And better yet, wear THICK pants.

Anyway, here are some room pics:


Now I'll discuss each of the five places that the kids could visit (in no particular order):

------ The Veterinarian ------


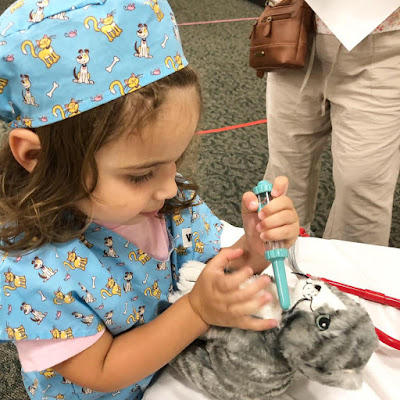
The Vet's station was made out of a rocking boat like this that we use for our Parent Child Workshop program. We turned the boat on its side and it immediately looked like a front desk! We marked the area around it off with tape and added the following:


------ HPL Cafe (The Restaurant) ------


We used the stage area of the auditorium for our restaurant and it worked out perfectly. We had plaid bunting flags (these from Oriental Trading) tied from one side of the stage to the other and they marked the area off really nicely. They really separated the restaurant off from the rest of the room and it actually felt kind of intimate! For the restaurant we used: 
  • 2 cafe tables with 2 chairs each
  • A book cart for keeping things somewhat together and organized
  • These bunting flags from Oriental Trading
  • A ton of play food that we had for Parent Child Workshop
  • Picnic plates (these from Oriental Trading) and plastic cups and utensils
  • Some other misc. plates and things
  • Menus that Jen made by making fake meals out of the play food and taking pictures
  • A chef costume that Jen had at home (but it's available here on Lakeshore Learning)
  • A hostess station which was just a music stand turned flat with napkins and a pitcher on it
  • Flameless candles (I had these at home)
  • Some signage


------ The Post Office ------


This was what we were calling our "least exciting" station because (1) we had the last amount of stuff for it, (2) we decided that kids don't even go to the post office that much anymore, and (3) it just LOOKED the least exciting. But surprise! The kids totally loved it! Here's what we had out on the table:


------ The Library ------


What library's Tape Town would be complete with a mini local library? We borrowed some furniture from our actual children's department (thanks to our maintenance department for doing all the heavy lifting here) and it wound up looking really cute and cozy. While at the Tape Town Library, the kids could sit and read a book, decorate a bookmark, or decorate their own pretend library card. Here's what we used (besides our borrowed furniture):


------ The Grocery Store ------


The kids loved this stop in our town and I think if I were a kid, I'd be loving it too. We set it up in sort of a squared off "U" shape so that the kids would be in the middle with the food to buy on two sides of them and the check out area on the third. Besides book carts, a stool, a piano bench, and a cardboard box, we used:


Like I said, this program was SO awesome. Rather than my usual "What worked least" and "What worked best" wrap-up, here are just some general notes on the program (I guess I'm really in a listy mood today):
  • The scooters were fun but weren't an integral part of the program. And actually, same goes for all the tape! It looked cool; it added a little more fun; but the real shining star of this program were the 5 different places we had set up. Half the time the kids just walked from one place to another and forgot about their scooters anyway. And, because we only had 6 scooters, we limited the program to 6 kids per session. BUT if we did "Mini Town" instead of "Tape Town" and took that whole element out, we could probably have more kids per session. And also, we could also probably fit a whole additional place in the middle of the room (school? car wash?) since we wouldn't need all that road/floor space for the traveling. But then again, the scooters and the tape roads really make the room look super fun. And they also make this program extra different from others. So... it's a thought.. something to mull over.
  • Just a general reminder that this program took five hours to set up. And it was exhausting. And the program itself was exhausting too. But man, it was SUCH a hit. The kids and parents loved it. One mom was even inspired to comment that she loves the library and that it feels like a little family when she comes here. We like to hear things like that!
  • IN SHORT, THIS WAS SUPER FUN AND WE HAVE TO DO IT AGAIN AND WE LOVED IT.

Wednesday, May 8, 2019

Dino Diggers


Is there any match as perfect as toddlers and dinosaurs? They go together like peanut butter and jelly! This would explain the huge sign-up I had for last week's Dino Digger's program, for ages 2-5.

We started off the program with a story-- just one. It was hard to choose which I wanted to read. Because I was only doing one, I kind of wanted a true story book, but I wanted it to be short and easy enough so that even the youngest kids in the group would get something out of it. There are a lot of great dinosaur books, but I wound up picking Roar by Todd H. Doodler, which I'd used (with success) for pre-school visits some years ago. I think everyone enjoyed it, although I'm not sure if they enjoyed it more than they would have enjoyed, say, Dinosaur Vs. Bedtime, How Do Dinosaurs Say Goodnight?, The Super Hungry Dinosaur, or Dini Dinosaur. There are a few good class-roaring opportunities throughout Roar, so it's got that really big perk going for it. (Nevermind the fact that I had a sweet boy afraid of loud noises. Details, details.)


After the book, I opened the room up for a sort of "free play." I had several different activities available and about 30-minutes for children and caregivers to make their way around the room to try it all out.

There were:
-- Two sand bins with sifters and dinosaur skeletons buried for the kids to dig around in *
-- Several dinosaur puzzles
-- A volcano picture made by blowing watered down paint through a straw **
-- A trace-a-dino-footprint worksheet ***
-- Dino eggs to inspect and match up with their corresponding pictures ****

* The sand bins and the dinosaur skeletons are things we own and have on hand. We don't use them very often but when we do, they are always, always, always a big hit. It was time to break them out again and, as usual, they were awesome.


** I got the idea for this craft from Pinterest-- specifically, it came from OurLittleAcorns.com. I had pre-cut volcanoes (although my coworker commented that they looked like poops), watered down red and orange paint with straws for blowing, and these puffy dinosaur stickers, which were cool, though smaller than I'd anticipated. This craft was fun, but way too hard for the younger crew. In fact, I tried it at home with Sadie (who's 2½) and she liked doing it in theory, but was kind of clueless and not really strong enough, physically, to blow the paint around through the straw. The stickers though, now those were easy and fun for her. On the other hand, the 4ish-year-olds in the class had great success with blowing the paint!


*** The trace a dino footprint worksheets can be found here, on PagingSuperMom.com. I printed a stack and a few kids did them. I also took one home for Sadie and she liked it!

**** The dino eggs were fun! I borrowed these from our county's lending library. They are a total mystery to me. I seriously have no idea how they were made but they're really cool looking! Basically, they're colorful plastic dinosaurs living inside Easter egg-sized, clear plastic homes, with a texture similar to that of a fancy, un-started bar of soap. To go with them, I made some match-up sheets to encourage the kids to examine the eggs and play with them a little. I think it worked pretty well.

This is a picture I took of the eggs and sheets a long time ago. I have since lost my original sheets and the eggs got a little cloudier. But this really gets the idea across:


Some "egg-xamining" in action below. The boy pictured was so smart! Instead of matching the eggs with the pictures, he wrote down the name of every type of dinosaur! I told him that was the "advanced way" to do this activity.


What worked least: As a whole, this was a great program (that I received a lot of great feedback about!) but it's true that the paint blowing craft was probably better for the 4+-ers of the group and not the younger kids. Even despite this, the younger ones watched their parents/caregivers blow the paint and still enjoyed the sticker scene aspect of the craft, so I'm not sure I'd have even changed anything in retrospect!

What worked best: The sand. It's always all about the sand.

Tuesday, December 11, 2018

Snow Much Fun!


I have this thing about winter. Mostly, I absolutely despise it. But for the month of December, and the month of December ONLY, I actually kinda like it! It's new! It's exciting! The holidays are upon us! And my winter coat still feels cozy instead of cumbersome! Last Friday I decided to embrace the one lasting good thing about winter-- playing in the snow! (Please note: I hate the snow and wish it would just stay July forever. But bringing my daughters outside with the neighborhood kids on a solid, no-pressure-to-drive-in-it snow day IS sort of enjoyable.) So, despite my true feelings, I was able to muster up enthusiasm--quite a bit actually--for an exciting, snow-themed program.

Snow Much Fun!, for ages 2-5, was, well, snow much fun. It consisted of 3 parts:

1. A book. Specifically, The Jacket I Wear In the Snow by Shirley Neitzel (an oldie but a goodie!). If you're not familiar with it, this book uses lots of repetitive words and pictures to explain all of the bundling that goes in to getting ready for a day in the snow. And it replaces certain words with pictures. For example the word "jacket" is always a picture of a jacket. The word "zipper" is always a picture of a zipper. It's good for little ones because, theoretically, they can chime in as they recognize the pictures. Each page builds on another item that the main character has to wear to go outside. In my head, I imagined the kids chiming in each time one of these repetitive pictures presented itself. I definitely thought there would be a lot of kids yelling "mittens!" and "socks!" But in real life, I mostly just read it straight through and was lucky if they chimed in for just the last word on each page, "snow." That was fine though. It held most of the kids' attention, even that of a couple of two-year-olds.

2. A mommy & me craft. I decided on snowflake tape resist watercolor paintings. Basically, for this,  mom/dad/caregiver puts down painters tape in the shape of simple snowflakes and then the kids can watercolor over the whole sheet however they want. Then, later, when the tape is pulled up, it looks like a snowy sky-- stolen from Little Bins for Little Hands, thank you.

Here are a few picture of kids working on their craft:


And here are a few finished products (minus the ripping off of the painters tape):


3. Sensory play. This was the part of the program that I was the most excited about. It was a chance for the kids to play in homemade snow. The snow wasn't made with the kids, but rather ahead of time for the kids. There are a lot of homemade snow recipes floating around out there on the ol' Internet, but the one I used today is one that I used once before a few years ago in a program called "Snowmen For Everyone." It's made with only baking soda and white conditioner. I found a few different recipes online with slightly different ratios of each of these items, but I wound up working out a super easy one:

Two 1-lb boxes of baking soda + 1 cup of conditioner

Last time I made this snow, I wound up doing a ton of measuring and portioning and it made a huge mess and took forever. This time, I figured out this shortcut and it was super quick and easy. 2 boxes. 1 cup. Mix. Done. You wind up with something the consistency of dense, wet snow. It's like the kind that's good for making a snowman and that you hate to clean off your car. We even tossed it in the refrigerator for 45-minutes before using it so it was cold like snow! In the future, if I ever do this program again, I would do 4 boxes of baking soda and 2 cups of conditioner in each bin. But today I used 2 boxes and 1 cup and it really worked out just fine. There wasn't a ton, but there was enough. I added a few plastic toy animals, matchbox cars, and plastic spoons to each bin, and--viola!--donezo! Fun snow to play with inside!


What worked least: I'll say the book worked least, but not because it was a bad book or even because it just wasn't a success. It was, in fact, probably about as successful as reading to 2-4 year-olds can be! But compared to the craft and the homemade snow, I'd call the book the least exciting part of the program. That's ok! Something has to be.

What worked best: Is it not obvious? The snow! SNOW MUCH FUN.

Monday, March 12, 2018

Block-a-Palooza


There's not much to say about last Tuesday's Block-a-Palooza! It was so simple, yet so great-- an all around win for a repeat in the future! For ages 2-5, here's what my newsletter description said:

Mix and mingle lots of different types of blocks and figurines to create whatever you can imagine! This program is self-directed, so work at your own pace.

This sums the morning up pretty accurately. I put out lots of blocks--possibly every block in the library--the big, cardboard brick kind; the traditional, simple wood kind; colorful, wood ones that kind of work with the traditional wood ones; the soft, rubber kind; and some foamy ones that might be meant for the bath. Plus matchbox cars, different plastic animals, mini stuffed animals, and some plastic boats. Then, when the kids arrived, I handed them a (plastic) hard hat, put on a playlist I'd made for the occasion, and told them to just enjoy! THAT'S IT!


What worked least: I felt like this program was too easy. After I set it up and looked around the room, it seemed so... mediocre. It was just a room of blocks and little toys. Blah. But when the families came in, everyone LOVED IT. They were so happy! They even told me it was a great idea! I guess sometimes simple is all you need!

What worked best: The mix of different blocks and toys really allowed the kids (and parents) to get creative. I would do this program again and I wouldn't change a thing!

Fun note: I specifically told everyone that they didn't have to worry about clean-up, that the luxury of making a mess and leaving it was part of the fun of this program. But these families were so sweet. They all insisted they help put things away. We have the best patrons ever! 💜

Friday, January 19, 2018

Pre-School Art


Back in October I did a program called Easy Art, which was the inspiration for this similar version of the program. This program was all about process, not product. Like Easy Art, it was meant to be a chance for kids (ages 2-5) to get messy, be creative, and have fun! (In the newsletter, I wrote "dress for a mess.")

I had four "creative stations" set up. Then, when the kids came in, I put on some music and let them move freely around the room, from station to station, making crafts and exploring. Same format as Easy Art and tons of fun for everyone!

Here are the stations I had set up:
Watercolors


To accommodate different ages and abilities, along with the watercolor palettes, I put out sponge brushes, skinny paint brushes, and white crayons for a little wax resist fun. The white crayons went largely unused but a few parents wrote little messages for their kids to uncover and it was cute. This was probably the most "challenging" station of the bunch, but the kids really had fun and did great!


Stamping


This station was the easiest for me to set up. Kids ages 2-5 don't need anything too fancy here. I put out some big white paper, 4 stamp pads, and an assortment of rubber stamps and let the kids go wild. It was enough! Everyone had fun!


Collage


I think the collage table was consistently one of the most crowded stations of the afternoon. I put out colored construction paper (yellow and baby blue), scissors, pre-cut shapes, glue sticks, Elmers glue, a TON of assorted pom poms, and colorful pre-sticky-backed buttons. The kids really got creative here (see below). I wound up seeing a really big variety of completed projects. Some kids did lots of cutting; some kids built pom-poms up to make really neat 3D art; and some kids wound up making a lot of things that looked like happy faces. The kids spent a lot of time here. This station, again, was a total success!


Play Dough


What can I say? It's play dough. Easy to set up, fun to work with, and the only station that required a tarp on the floor below it. This was the only station where the kids didn't get to take their product home, but nobody seemed to mind-- play dough is worth it! Plus this wasn't a program meant for taking home an awesome craft, but a program meant for playing and being creative!


What worked least: A few years ago I let myself put "nothing" for what worked least and today, I am doing it again. This was an easy program that, despite taking a decent amount of set-up, didn't take a lot of planning, money, supplies we didn't already have on hand, or exhaustion on my part. The kids liked it and the parents liked and--what can I say besides it just worked?!

What worked best: I'd say, while again, all of this program felt like a success to me, the two "best" stations of the hour were the play dough and the collage.

Overall, this was really fun! I definitely need to do more programs like this one and Easy Art in the future.