Resources

Thursday, June 23, 2016

Kiddie Prom Party


I've run lots of different variations of Toddler Dance Party (which, in itself, is a variation of Musical Kids) but last week's Kiddie Prom Party was one of my very favorites! It included everything I love about Musical Kids and my past Toddler Dance Parties PLUS fancy outfits, a photo backdrop, and special gold crowns!

I wanted a playlist made up of songs similar to my regular Musical Kids songs, but also, I wanted to spice it up a bit since this was the prom and all. Here's what I wound up with (red = ipod, blue = sing):

1. Hello Song by Big Jeff
2. Celebration by Kidz Bop Kids (shakers)
3. Stop & Go by Greg and Steve (shakers)
4. Jumping and Counting by Jim Gill
5. Shake, Rattle, and Roll from Dance Party Fun (drums)
6. The Tempo Marches On by Jim Gill (drums)
7. Rocketship Run by Laurie Berkner (rockets) *
8. Bread & Butter (sticks) **
9. Whole Lotta Lovin' by Fats Domino (sticks)
10. Toast in the Toaster (parachute + balloons) ***
11. Hot Poppin’ Popcorn by The Wiggles (parachute + balloons)
12. Let's Go Riding in an Elevator (parachute) #
13. Merry Go Round by Wee Sing x2 (parachute) ##
14. The Balloon Game by Music for Little People Choir (balloons)
15. Blow A Kiss by Laurie Berkner ###

I also played a few extra songs at the end for taking pictures:

1. Itsy Bitsy Teeny Weeny Yello Polka Dot Bikini by The Kids from Kids Looney Party Tunes
2. Walking on Sunshine by Kidz Bop Kids
3. Monster Mash from Dance Party Fun (which I didn't ever actually wind up playing. Everyone was already out of the room by the middle of Walking on Sunshine).


* I write about Rocketship Run every single time I blog about my middle or oldest Musical Kids group. It's an absolute essential. I couldn't do the class without it. When we do this song, I hand out rockets-on-sticks for them to zoom around with, and then also, I hold up signs for all the places we "travel" to. Here's my stuff:


When I hold up each sign, the kiddos all run up and touch their rocket to the sign, like they're really "going" to the sun/moon/etc. I'VE NEVER TOLD THEM TO DO THIS, and yet in every class, it happens. It's so funny! They totally invented it and it's continued on from class-to-class.

Side note: I occasionally do a similar program at my local library and they do it there too! How do they all know to do it? I don't understand! It's adorable!

** This is Bread & Butter, thanks to Jbrary (although I modified it a teeny bit):


*** Another Jbrary one! Toast in the Toaster:


These lovely ladies recommend this as a great movement song, but I have always used it as a parachute song instead! We bounce the balls (we used balloons instead today!) gently until the word "pop," then we give a big snap and let the balls (or balloons) fly up! Usually everyone follows this with a soft "wooooh!" and usually I sing it twice.


# Might as well keep the Jbrary theme going today. Here is Let's Go Riding in an Elevator:


I sing this a lot slower for suspense. Then I have the kids go under the parachute as the floors move up higher and it works really, really well. The kids love it! I highly recommend this as a parachute song!


## Like Rocketship Run, Merry-Go-Round has become an essential part of my Musical Kids repertoire. For this, we lay the parachute down flat on the ground and the kids crawl into the middle and sit down flat. There are usually 1 or 2 kids who are either afraid of this or who would just prefer to stand outside the parachute with the grown ups, but the majority of the group likes this part the best of all! When the kids are all seated in the middle, the grown ups pull up from the parachute's handles and we all walk around in a circle, giving the kids a ride. I play the song twice (it's only 28-seconds long) and we change directions for the second time around. Here they are on their ride:


### I prefaced my usual "goodbye song" today by saying that, while this was the "goodbye song," I had a few other fun songs coming on after it, so there would be plenty of time to hang out and take pictures against the backdrop. BUT FIRST... I needed to crown all the prom kings and queens (aka everyone). The kids went wild for the crowns (these from Oriental Trading). Because these are just cardboard Oriental Trading crowns and not of the highest quality, I pre-taped them in three different sizes and handed them out based on the ages of the kids. Seriously, they all loved them! Then it was picture time! I want to share a few of my favorites:


What worked least: Shake, Rattle, and Roll felt a little long. But really, that's it! It was still fun and, honestly, I'm not even sure I would have swapped that song out for anything else if I had the chance to re-do it! It was a fun song for a change and helped with the partyish vibe I was going for! So there.

What worked best: Oh just... EVERYTHING. This was basically all the success of Musical Kids + cute outfits, balloons, give away crowns, and a photo backdrop!

Wednesday, June 15, 2016

Tostitos & Trivia: the Good, the Bad, and the Ugly


I'd been itching to do a trivia-type program for a while and, when I told my husband that "I need a snack that starts with T for an alliterate trivia program," he immediately came up "Tostitos and Trivia" for me. I was excited! I worked really hard on Tostitos and Trivia!

I came up with 10 questions in 5 different categories (for a grand total of 50 questions), with multiple choice answers, for grades 1-5. IT WAS HARD. I scoured tons of different kids trivia type websites and even still, wound up mostly creating my own questions and, at the very least, creating my own multiple choice answers.

You can download my 50 questions and answers here! The correct answers are the ones in red. 

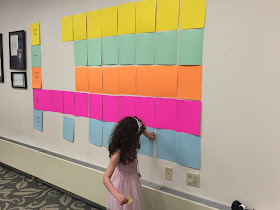
I labored over the questions for weeks. Then a few days before the program, I put each question on its own sheet of cardstock, picking a different color for each category: Yellow for "Sports and Games," green for "Animals," orange for "Movies & Books," pink for "The World," and blue for "Science & Math." Then I taped them all up to the wall in rows like this:


I used removable tape so the questions would be easy to rip off, but unfortunately, it wasn't exactly the best cardstock-holder-upper. I wound up taping and retaping the questions up. Anyway, eventually, with enough layers of tape, they all stayed. Then I poured chips and salsa for all the kiddos (didn't even sneak any for myself!) and we were set to go. Bring on the kids...

Or not. I got one...waited...and then eventually got one more. Two kids were enough to run the program but not really enough to make it the super, action-packed, and competitive game that I'd envisioned. Also unfortunately, the kids were 2-years apart, which, apparently is HUGE in the world of trivial facts. So as the older child began to, more or less, "sweep the floor" with the younger one, I favored the younger to try to level the playing field a bit. Luckily, they were both cool and good sports, which was helpful.


Then, to top it all off, neither of the kids even liked the salsa! I'd poured it all out and wasted it for nothin'! 

I'd say the running theme of this program was disappointment. It was a ton of prep work for two kids who, I don't know, I guess mildly enjoyed it. As they are both regulars, I certainly wouldn't call this either of their favorite library programs.

What worked least: I feel like nothing worked particularly great but, in my defense, that it wasn't my fault. Maybe this would be better run as a mid-summer program in the middle of the day, but it certainly didn't draw a crowd in on a Thursday night in June. Bummer.

What worked best: The actual format of this was perfect. Smartly (if I do say so myself), I saved all the printed questions so that if I do ever decided to re-run this program (in the middle of the day in the summer), I'll have the hard work done. Plus, even if I get the same disappointing turnout next time, it'll be a lot less time invested the second time around.

They can't all be the best, right? Oh well.

Thursday, June 9, 2016

Taste Test Challenge


Taste Test Challenge! This is probably the most "me" program ever to exist (I love tasting things; I love socially eating; and I love guessing games), but to be perfectly honest, I stole the idea from another library (Thanks Patchogue-Medford)! When I saw it, I knew it was for me.

I had fun shopping and prepping for this program. The idea was that I would put out unmarked samples of snacks and see if the kids could "put their palette to the test" to determine the difference between brands...all coming to a crest with samples from three local pizzerias.


Here is my complete list of samples:

Tasting # 1
Cheez-Its vs Cheese Nips

Tasting # 2
Bachman Pretzels vs Utz Pretzels

Tasting # 3
Ruffles vs Wise Ridgies

Tasting # 4
Fruit Punch Powerade vs Fruit Punch Gatorade

Tasting # 5
Chips Ahoy vs Chips Deluxe

Tasting # 6
Coke vs Pepsi

Tasting # 7
7up vs  Sierra Mist

Tasting #8
Wildberry Seltzer vs Lime Seltzer vs Orange Seltzer

Tasting # 9
Rosa’s Pizza vs  Gino’s Pizza vs Little Vincent’s Pizza


I had each kid take their own voting sheet and walk around the room quietly, tasting the samples and checking off which snack they thought was which. You can view and/or download my full voting sheet here!


Then, when all the kids (err, well most of the kids at least) were done tasting and voting, instead of revealing the answers, I built up suspense by playing another game with them: What Candy Bar Am I? This game was very generously sent to me from Jenna at the Peapack & Gladstone branch of the Somerset County Library System of New Jersey.

The game was in the format of a simple Power Point presentation. It showed 11 candy bar cross-sections and the kids had to guess what they were. I ran through the presentation, having the kids mark off their guesses on the form, then I revealed the answers. I thought it'd be a quick game but it was longish and the kids really liked it! Another thing the kids really liked: Making shadow puppets in front of the projector. 

Then, it was time for the big answer reveal. As I went down the line of snacks, the kids marked off their own papers. I asked them to raise their hands to show what they guessed and everyone was pretty loud about it. It was fun and I don't know, at least for me, it was kind of exciting! I liked seeing how they all did.

At the end of the program, my coworker and I gave each other the taste test and honestly, I did just really really badly. I was surprised how difficult it was! Especially with the seltzer flavors. So hard! 


What worked least: I tried really hard to keep this 100% sanitary with every sample portioned out (by a gloved hand) in a little cup, but some of the kids didn't get how the little cups worked. For example, I saw someone take a Cheez-It from a cup and then leave the other Cheez-It in the same cup and walk away. I kept saying, "Take the whole cup and then hold onto it or throw it out." KEPT SAYING IT. But I don't know. Ya can't see everything, you know? I guess maybe this is just par for the course with kids and food.

What worked best: The whole program was super fun! I loved how enthusiastic all the kids were when I revealed the answers--big groans and loud "yes!"-es. Everyone really, really enjoyed themselves and my turnout was pretty good too! Big group + Happy kids = Success! Yay!

Tuesday, June 7, 2016

Junior League Artists


Last June I did a program called Little Helpers, where I basically made giant, foam board "Little Helpers" coloring sheets (our Early Literacy Read-to-Me club theme) and had the kids help me color and decorate them so we could have a nice, hand-made, summer display in the department.

It went really well so I decided to do it again this year! This summer's Early Literacy Read-to-Me club is called Junior League (as part of the CSLP Reads Theme, "On Your Mark, Get Set, Read"), so again, I made giant foam board coloring sheets with those words on them. This takes a little more prep than it may look like. First, I printed out the letters in the words using our Circut machine. (Last year we didn't have a Cricut and I, instead, just printed letters on the computer and cut them out. The Cricut made this easier this year, but it's still totally doable either way!) Then I traced the letters onto the foam board in pencil. I did this two times for each word so we could have four signs in total. Next, I went over my pencil lines with thick black paint (and a really cruddy paint brush!) and these were basically my coloring "pages." After that, I asked one of our maintenance guys to drill two holes in the top of each board (for hanging later) and I was set to go! Here are the results, all laid out and ready to be decorated:


Last year, I debated a lot about what craft supplies to put out for the kids to use. I wanted a variety of things, but I didn't want anything to overpower the words too much. Finally, I'd settled on crayons, stamp pads for hand prints, colored pencils, and do-a-dot markers. This year I made it easy on myself and used the exact same supplies, which again, were perfect. Why recreate the wheel, right?

Then the kids came in and, more or less, they went to town:


Last year I needed to go over the letter outlines again once the signs were decorated, but this year the colors were all a lot lighter in general so I skipped it. Here are the finished products:


 And here they are, all hung up in their home for the summer:


So beautiful!

What worked best: I think the relaxed, hang-out-and-color nature of this program made it fun for everyone who came. Moms chatted and colored; kids stamped their hands without a care; even the librarian (me) enjoyed just hanging out for a little while. It was just laid back and fun.

What worked least: Last year I got a bigger turnout with more coloring! This year, when the program was over, there was still white space left! So my coworker and I had to fill it in ourselves (shhh).

 All-in-all, this was a super-fun craft that both the children and the adults really enjoyed!

Wednesday, June 1, 2016

Munchkins With Mommy & Donuts With Daddy


Nestled comfortably between Mother's Day and Father's Day, last Wednesday, May 25th, I hosted a program called Munchkins With Mommy & Donuts With Daddy to celebrate parents in general.

In the past I have discussed how there are some programs I'm super excited about and then there are other that seem fun when I first plan them, but then kind of mediocre when the time really comes to do them. But this was one of the former! This program included 4 different crafts, 2 books, and best of all, Dunkin Donuts! What was not to be excited about?!

I had 15 kids + 15 parents signed up for the program and I enthusiastically set the room up hours in advance. But, sadly, I had a very disappointing turn out. It was THE most beautiful day--sunny, hot, and the first of its kind since last summer. And in a town with a playground, pond, candy store, and multiple ice cream shops, I found that the lil' ol' library just couldn't compete on the first summery day of the year. I wound up with 4 kids and 3 adults. A major let down.

Those numbers considered, you might say that I over-prepared crafts and I overbought donuts and munchkins (luckily there was a teen program later that night that my coworker could use the leftovers for). Anyway, here was my very ambitious donut/munchkin display:


When the kids came in, I served them a snack first. I made sure to not let anyone touch the donuts, only me and only with gloves. Once they were set with their goodies, I sat them down for books. First, I read Meet the Parents by Peter Bently, followed by Pete the Cat: Rock on, Mom and Dad! by James Dean. The kids enjoyed them both and I think the parents did also.

Then it was time to move onto the crafts. Like I said, I had 4 crafts. I set them up like stations for the kids and parents to move around between freely. Here's what we had:

"I Wished For You" Finger Paint Craft

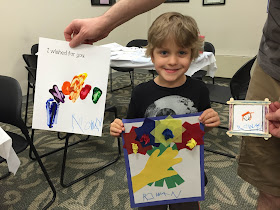
This was a quickie, made with younger siblings in mind. I found a picture of a dandelion stem online, altered it a tiny bit, added some text, printed it on card stock and let the kids finger paint on colorful seeds. It was inspired by this gem on Pinterest. Here, in fact, is a younger sibling enjoying himself:


Tissue Paper and Traced Hand Bouquet

I found this craft somewhere on the Internet (probably Pinterest) and thought it was perfect for this program. I had paper for hand-tracing, pre-cut green stemps, pre-cut tissue paper squares, white paper, pre-cut/pre-measured blue paper for matting, and glue sticks. With the parents' help, almost every craft (not that there were than many) came out really similar to my sample seen above! (See the top photo for proof!)

I Love You To the Moon And Back Collage

I think this one, of all of the crafts, had the most steps. First, the kids had to color a piece of construction paper like the night sky. I put out a sky colors-- black, blue, and purple. Then, they had to glue popsicle sticks on like a ladder. Next, there were pre-cut circle moons and pre-cut "I love you to the moon and back" sayings to glue on. Then, last, they added star stickers. I got a mixed bag of products, but I think they had fun making these.


Popsicle Stick Frame Magnets

The last, and probably simplest of the crafts were the popsicle stick frame magnets. I had popsicle sticks, markers, glue, magnet tape, and pre-cut square inserts to make gluing easier. This was pretty self-explanatory but allowed a lot of creative freedom and was totally liked by everyone!

What worked least: Nothing worked least per say, it just all worked eh. Sometimes it's so hard to have a super lively program with such a small turn out. Seven people total, as lovely as they were, just didn't make the program as exciting as I'd hoped.

What worked best: Pete the Cat. Typical Pete!